
31 KiB
FastAPI

FastAPI framework, high performance, easy to learn, fast to code, ready for production




Documentation: https://fastapi.tiangolo.com
Source Code: https://github.com/fastapi/fastapi
FastAPI என்பது Python-இல் standard type hints அடிப்படையில் API-களை உருவாக்க உதவும் ஒரு நவீன மற்றும் வேகமான (high-performance) web framework ஆகும்.
இதன் முக்கிய அம்சங்கள்:
- Fast: மிக அதிக performance, NodeJS மற்றும் Goக்கு சமமாக (Starlette மற்றும் Pydantic காரணமாக). Python frameworks-லேயே மிக வேகமான ஒன்றாக.
- Fast to code: அம்சங்களை உருவாக்கும் வேகம் சுமார் 200% முதல் 300% வரை அதிகரிக்கலாம். *
- Fewer bugs: மனித (developer) காரணமாக ஏற்படும் தவறுகள் சுமார் 40% வரை குறையலாம். *
- Intuitive: சிறந்த editor support, எல்லா இடங்களிலும் Completion. debugging நேரம் குறையும்.
- Easy: பயன்படுத்தவும் கற்றுக்கொள்ளவும் எளிதாக வடிவமைக்கப்பட்டுள்ளது. documentation-ஐ படிக்கும் நேரம் குறையும்.
- Short: code duplication குறையும். ஒவ்வொரு parameter declaration-லேயே பல அம்சங்கள் கிடைக்கும்; bugs குறையும்.
- Robust: production-ready code வழங்கப்படுகிறது; automatic interactive documentation உடன்.
- Standards-based: API-களுக்கான open standards அடிப்படையில்...
* production applications உருவாக்கிய ஒரு internal development team செய்த tests அடிப்படையிலான மதிப்பீடு.
Sponsors
Keystone Sponsor
{% for sponsor in sponsors.keystone -%} {% endfor -%}
Gold and Silver Sponsors
{% for sponsor in sponsors.gold -%} {% endfor -%} {%- for sponsor in sponsors.silver -%} {% endfor %}
Opinions
"[...] இந்த நாட்களில் FastAPI ஐ நான் மிகவும் அதிகமாக பயன்படுத்துகிறேன். [...] உண்மையிலேயே இதை என் team-னுடைய ML services at Microsoft எல்லாவற்றுக்கும் பயன்படுத்த திட்டமிட்டுள்ளேன். அதில் சில core Windows product-லேயே integrate ஆகிறது, சில Office products-லையும் ஆகிறது."
"predictions பெற query செய்யக்கூடிய ஒரு REST server உருவாக்க FastAPI library-யை நாம் பயன்படுத்த தீர்மானித்தோம். [Ludwig காக]"
"எங்களின் crisis management orchestration framework: Dispatch-ஐ open-source ஆக வெளியிட்டதை Netflix மகிழ்ச்சியுடன் அறிவிக்கிறது! [FastAPI கொண்டு build செய்தது]"
"FastAPI பற்றி நான் மிகவும் excited. இது மிகவும் fun!"
"உண்மையிலேயே, நீங்க build செய்தது மிகவும் solid ஆகவும் polished ஆகவும் உள்ளது. பல விதத்தில், Hug இப்படித்தான் இருக்கணும் என்று நான் நினைத்தது போலவே உள்ளது — இதை ஒருத்தர் build செய்தது பார்க்க மிகவும் inspiring ஆக உள்ளது."
"REST APIs உருவாக்க ஒரு modern framework கற்றுக்கணும்னு நினைச்சா, FastAPI ஐ பார்க்கவும் [...] இது வேகமானது, பயன்படுத்த எளிது, கற்றுக்கொள்ள எளிது [...]"
"எங்களின் APIs காக நாம் FastAPI க்கு மாறிட்டோம் [...] உங்களுக்கு இது பிடிக்கும் என்று நினைக்கிறேன் [...]"
"production Python API build செய்ய நினைப்பவர்களுக்கு, FastAPI ஐ நான் strongly recommend செய்வேன். இது beautifully designed, simple to use, மற்றும் highly scalable. எங்களின் API first development strategy-ல இது ஒரு key component ஆகி, Virtual TAC Engineer போன்ற பல automations மற்றும் services-ஐ இயக்குது."
FastAPI mini documentary
2025 முடிவில் வெளியான FastAPI mini documentary ஒன்று இருக்கிறது; அதை online-ல பார்க்கலாம்:

Typer, the FastAPI of CLIs

web APIக்கு பதிலாக terminal-ல் பயன்படுத்த ஒரு CLI app உருவாக்க விரும்பினால், Typer ஐ பார்க்கவும்.
Typer என்பது FastAPI-னுடைய small sibling. இது CLIs கான FastAPI ஆக இருக்கவே உருவாக்கப்பட்டது. ⌨️ 🚀
Requirements
FastAPI “giants” மேல் நின்று உருவாக்கப்பட்டது:
Installation
virtual environment ஒன்றை create செய்து activate செய்துவிட்டு, பிறகு FastAPI ஐ install செய்யுங்கள்:
$ pip install "fastapi[standard]"

---> 100%
குறிப்பு: எல்லா terminals-லையும் சரியா வேலை செய்ய "fastapi[standard]" என்பதை quotes-க்குள்ளே போடுங்க.
Example
Create it
main.py என்ற file ஒன்றை இப்படி உருவாக்குங்கள்:
from fastapi import FastAPI

app = FastAPI()


@app.get("/")
def read_root():
    return {"Hello": "World"}


@app.get("/items/{item_id}")
def read_item(item_id: int, q: str | None = None):
    return {"item_id": item_id, "q": q}
அல்லது async def பயன்படுத்தலாம்...
உங்க code-ல async / await பயன்படுத்துகிறீர்களானால், async def பயன்படுத்துங்கள்:
from fastapi import FastAPI

app = FastAPI()


@app.get("/")
async def read_root():
    return {"Hello": "World"}


@app.get("/items/{item_id}")
async def read_item(item_id: int, q: str | None = None):
    return {"item_id": item_id, "q": q}
குறிப்பு:
தெரியலைன்னா, docs-ல இருக்கும் "In a hurry?" section-ல async மற்றும் await பற்றி பார்க்கவும்.
Run it
server-ஐ இவ்வாறு இயக்கவும்:
$ fastapi dev

 ╭────────── FastAPI CLI - Development mode ───────────╮
 │                                                     │
 │  Serving at: http://127.0.0.1:8000                  │
 │                                                     │
 │  API docs: http://127.0.0.1:8000/docs               │
 │                                                     │
 │  Running in development mode, for production use:   │
 │                                                     │
 │  fastapi run                                        │
 │                                                     │
 ╰─────────────────────────────────────────────────────╯

INFO:     Will watch for changes in these directories: ['/home/user/code/awesomeapp']
INFO:     Uvicorn running on http://127.0.0.1:8000 (Press CTRL+C to quit)
INFO:     Started reloader process [2248755] using WatchFiles
INFO:     Started server process [2248757]
INFO:     Waiting for application startup.
INFO:     Application startup complete.
fastapi dev command பற்றி...
fastapi dev command உங்க main.py file-ஐ automatic-ஆ படிச்சு, அதில் உள்ள FastAPI app-ஐ கண்டுபிடிச்சு, Uvicorn பயன்படுத்தி server-ஐ start செய்யும்.
default-ஆ, local development காக fastapi dev auto-reload enabled-ஆ start ஆகும்.
மேலும் விவரங்களுக்கு FastAPI CLI docs பார்க்கவும்.
Check it
உங்க browser-ல http://127.0.0.1:8000/items/5?q=somequery ஐ திறக்கவும்.
JSON response இப்படியே வரும்:
{"item_id": 5, "q": "somequery"}
இப்போ நீங்கள் ஒரு API உருவாக்கிட்டீங்க, அது:
/மற்றும்/items/{item_id}என்ற paths-ல HTTP requests-ஐ receive செய்யும்.- இரண்டு paths-க்கும்
GEToperations (அதாவது HTTP methods) உள்ளது. /items/{item_id}path-லitem_idஎன்ற path parameter உள்ளது; அதுintஆக இருக்கணும்./items/{item_id}path-ல optionalstrquery parameterqஉள்ளது.
Interactive API docs
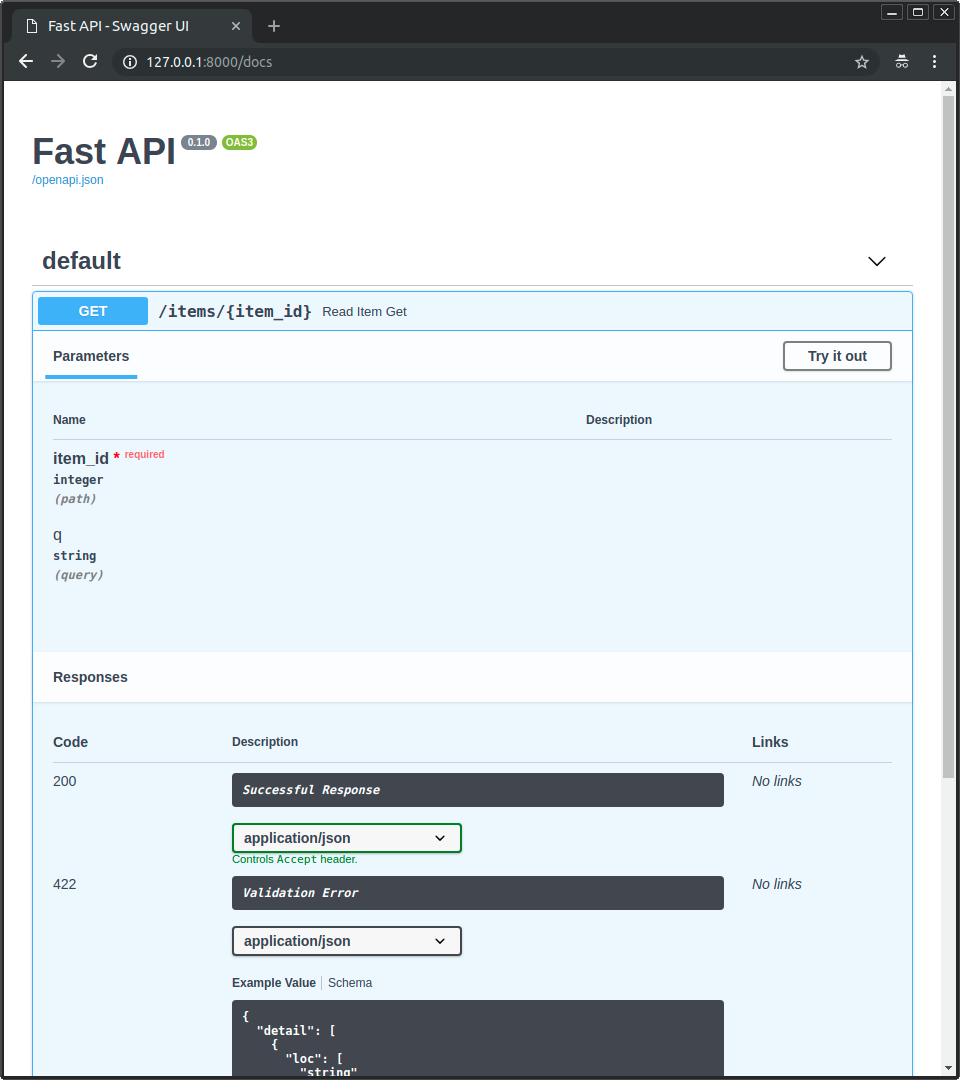
இப்போ http://127.0.0.1:8000/docs க்கு செல்லவும்.
automatic interactive API documentation (இதை Swagger UI வழங்குகிறது) உங்களுக்கு தெரியும்:
Alternative API docs
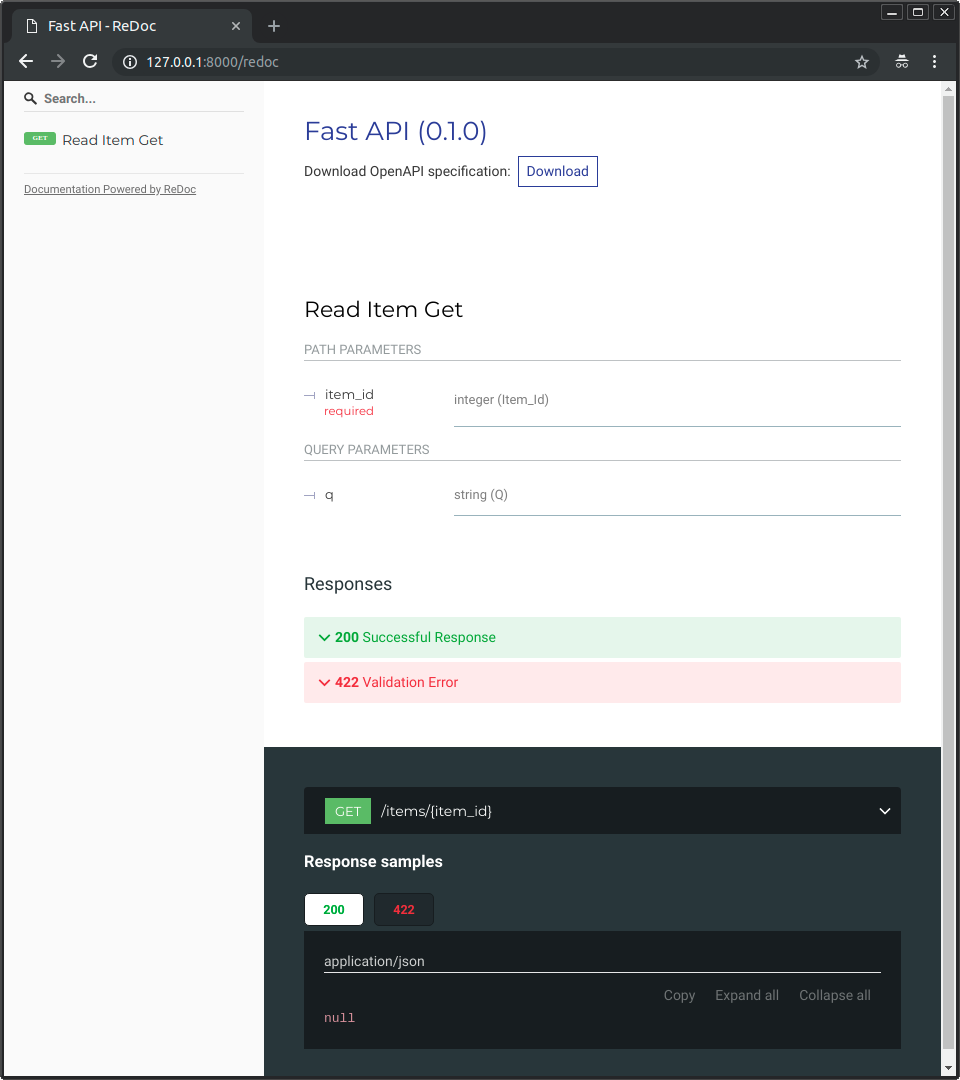
அப்புறம் http://127.0.0.1:8000/redoc க்கு செல்லவும்.
alternative automatic documentation (இதை ReDoc வழங்குகிறது) இங்கே தெரியும்:
Example upgrade
இப்போ main.py file-ஐ மாற்றி, PUT request-ல இருந்து body-ஐ receive செய்யுமாறு செய்யுங்கள்.
Pydantic உதவியால், standard Python types பயன்படுத்தி body-யை declare செய்யவும்.
from fastapi import FastAPI
from pydantic import BaseModel

app = FastAPI()


class Item(BaseModel):
    name: str
    price: float
    is_offer: bool | None = None


@app.get("/")
def read_root():
    return {"Hello": "World"}


@app.get("/items/{item_id}")
def read_item(item_id: int, q: str | None = None):
    return {"item_id": item_id, "q": q}


@app.put("/items/{item_id}")
def update_item(item_id: int, item: Item):
    return {"item_name": item.name, "item_id": item_id}
fastapi dev server automatic-ஆ reload ஆகும்.
Interactive API docs upgrade
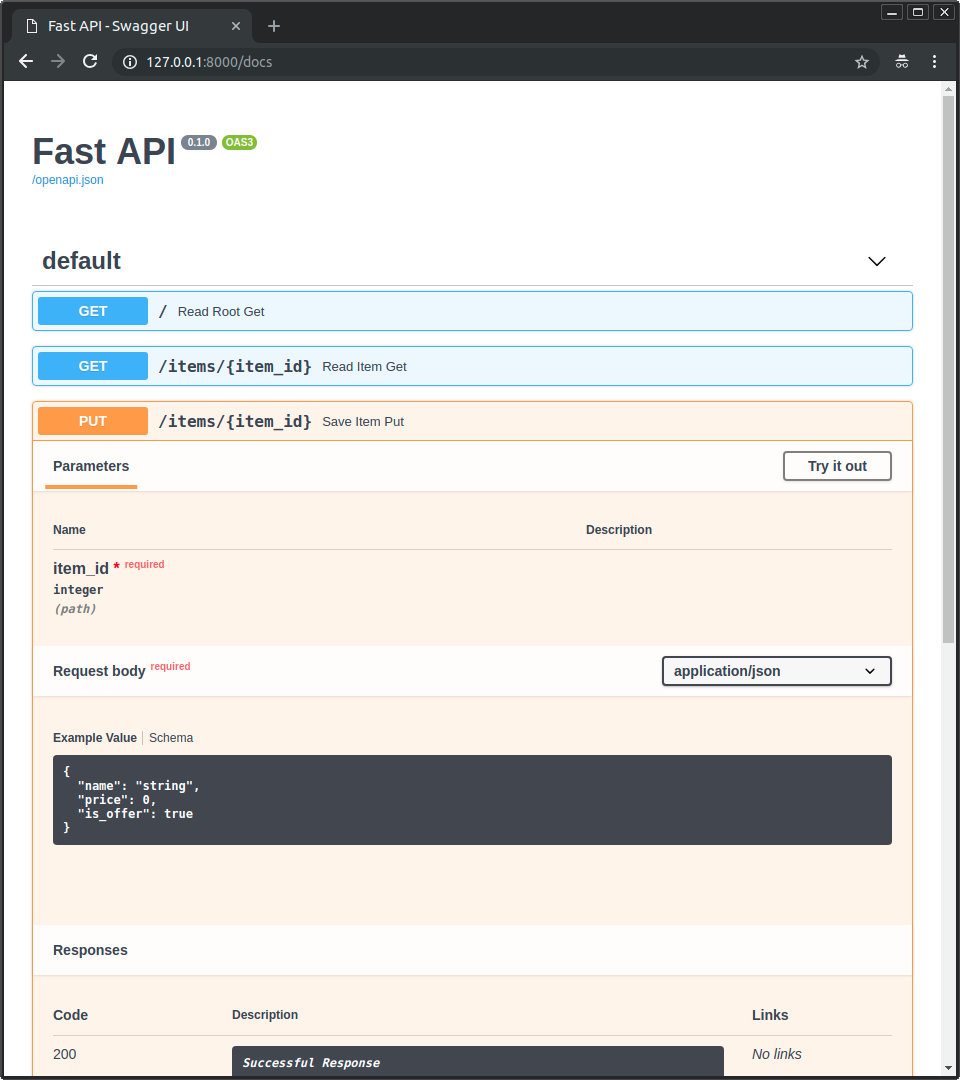
இப்போ http://127.0.0.1:8000/docs க்கு செல்லவும்.
- interactive API documentation automatic-ஆ update ஆகும்; புதிய body உட்பட:
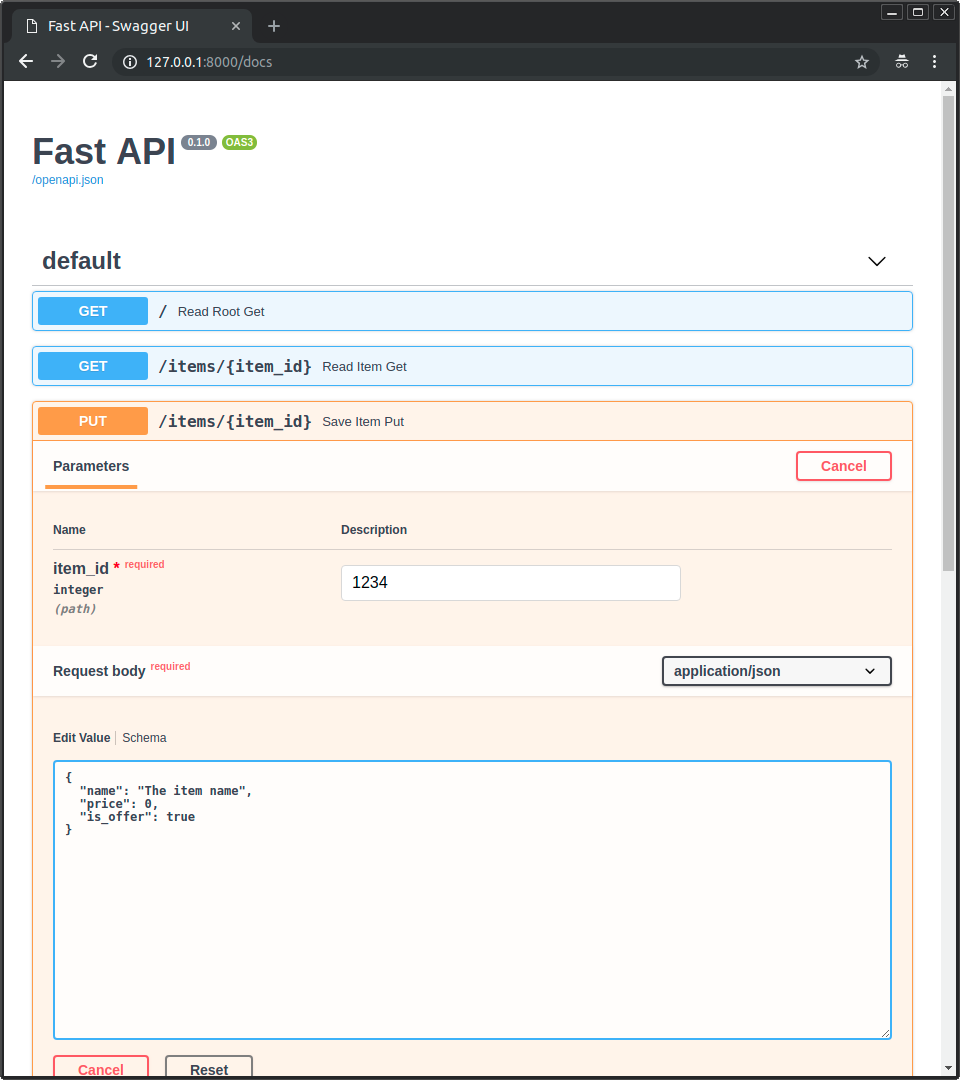
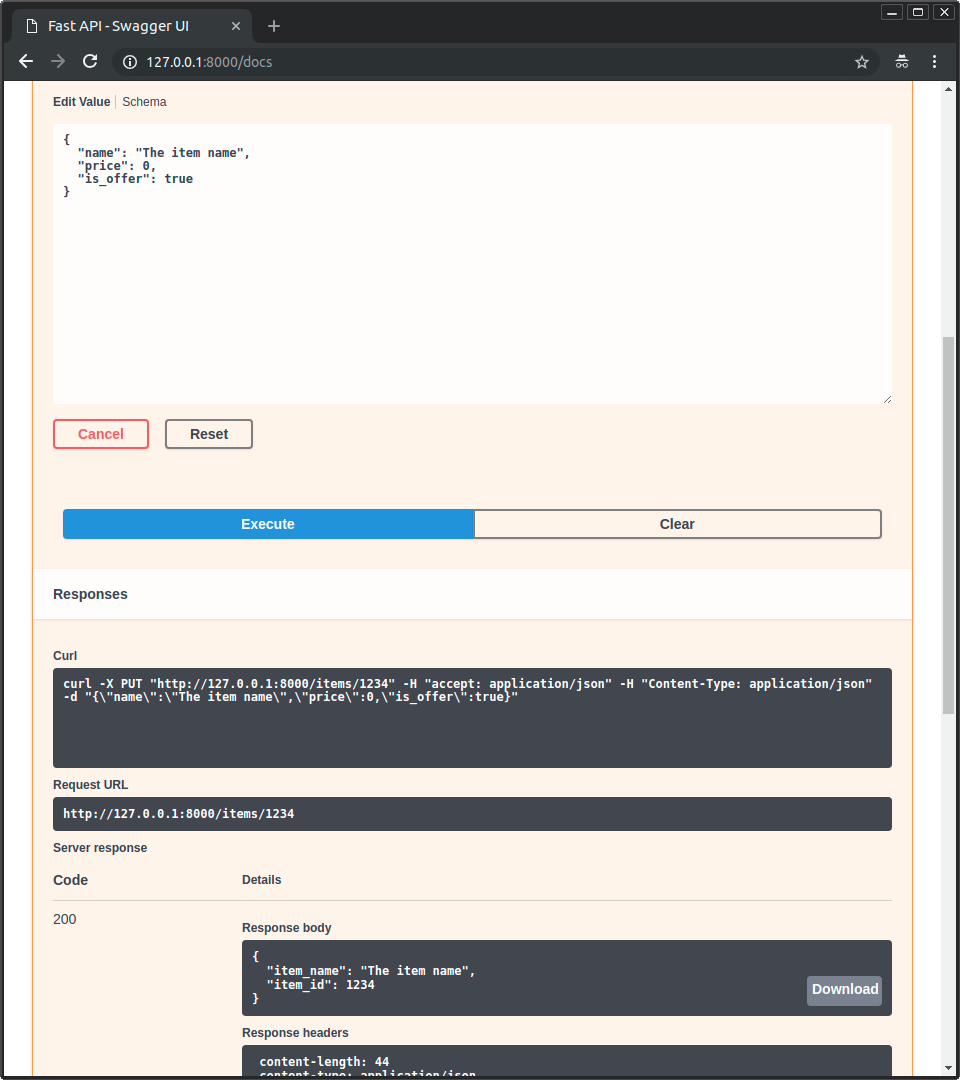
- "Try it out" button-ஐ click செய்யவும்; அதில் parameters fill செய்து நேரடியாக API-யோட interact செய்யலாம்:
- அப்புறம் "Execute" button-ஐ click செய்யவும்; user interface உங்க API-யோட பேசும், parameters அனுப்பும், results வாங்கி screen-ல காட்டும்:
Alternative API docs upgrade
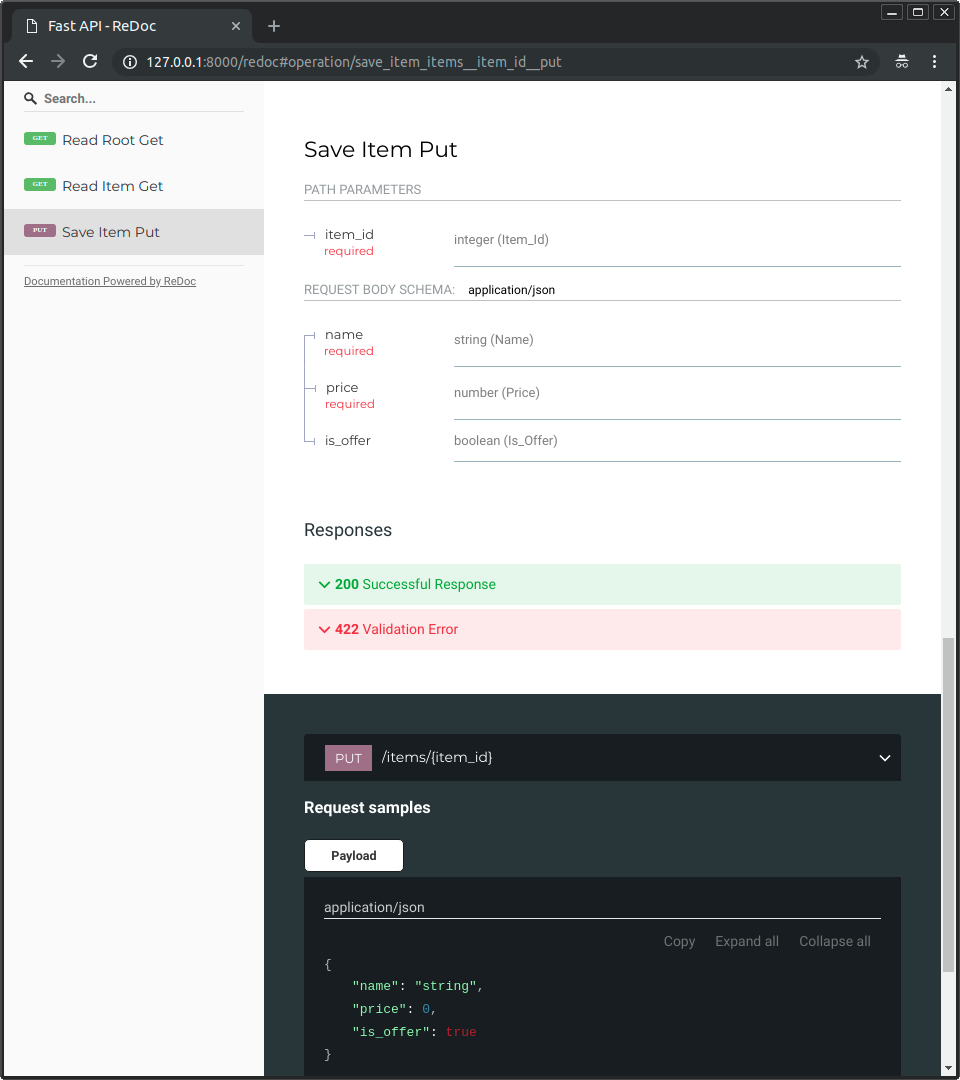
அப்புறம் http://127.0.0.1:8000/redoc க்கு செல்லவும்.
- alternative documentation-லயும் புதிய query parameter மற்றும் body reflect ஆகும்:
Recap
சுருக்கமாகச் சொன்னால், parameters, body, போன்றவற்றின் types-ஐ function parameters-ஆ ஒரே முறை declare செய்கிறீர்கள்.
அதை standard modern Python types-ஓடு செய்கிறீர்கள்.
புதிய syntax, அல்லது ஒரு specific library-யின் methods/classes போன்றவை தனியா கற்றுக்க வேண்டியதில்லை.
standard Python போதும்.
உதாரணத்திற்கு, int காக:
item_id: int
அல்லது இன்னும் complex ஆன Item model காக:
item: Item
...இப்படி ஒரே declaration-லேயே உங்களுக்கு கிடைப்பது:
- Editor support, இதில்:
- Completion.
- Type checks.
- Data validation:
- data invalid இருந்தா automatic-ஆ தெளிவான errors.
- deeply nested JSON objects க்கும் validation.
- input data-வின் Conversion: network-ல இருந்து Python data/types-களாக மாற்றுவது. இவற்றிலிருந்து வாசிக்கிறது:
- JSON.
- Path parameters.
- Query parameters.
- Cookies.
- Headers.
- Forms.
- Files.
- output data-வின் Conversion: Python data/types-ல இருந்து network data (JSON ஆக) மாற்றுவது:
- Python types (
str,int,float,bool,list, etc) மாற்றுதல். datetimeobjects.UUIDobjects.- Database models.
- ...இன்னும் நிறைய.
- Python types (
- Automatic interactive API documentation, இதில் 2 alternative user interfaces:
- Swagger UI.
- ReDoc.
முந்தைய code example-க்கு திரும்பி பார்த்தா, FastAPI இது எல்லாம் செய்யும்:
GETமற்றும்PUTrequests காக path-லitem_idஇருக்கிறதா என்று validate செய்யும்.GETமற்றும்PUTrequests காகitem_idtypeintதானா என்று validate செய்யும்.- இல்லையென்றால் client-க்கு பயனுள்ள, தெளிவான error தெரியும்.
GETrequests காகqஎன்ற optional query parameter இருக்கிறதா என்று check செய்யும் (http://127.0.0.1:8000/items/foo?q=somequeryபோல).qparameter= Noneஉடன் declare செய்யப்பட்டது காரணமாக அது optional.Noneஇல்லையென்றால் அது required (PUT-ல body போல).
/items/{item_id}க்குPUTrequests வந்தா, body-யை JSON ஆக வாசிக்கும்:nameஎன்ற required attribute இருக்கிறதா, அதுstrதானா என்று check.priceஎன்ற required attribute இருக்கிறதா, அதுfloatதானா என்று check.is_offerஎன்ற optional attribute இருந்தா, அதுboolதானா என்று check.- இதெல்லாம் deeply nested JSON objects க்கும் வேலை செய்யும்.
- JSON-க்கு/JSON-ல இருந்து automatic-ஆ convert செய்யும்.
- எல்லாத்தையும் OpenAPI-யோட document செய்யும்; இதை பயன்படுத்த முடியும்:
- Interactive documentation systems.
- பல languages-க்கு automatic client code generation systems.
- நேரடியாக 2 interactive documentation web interfaces கொடுக்கும்.
இது இன்னும் தொடக்கம் மட்டுமே; ஆனாலும் இது எப்படி செயல்படுகிறது என்பது பற்றிய ஒரு தெளிவான புரிதல் இப்போது உங்களுக்கு கிடைத்திருக்கும்.
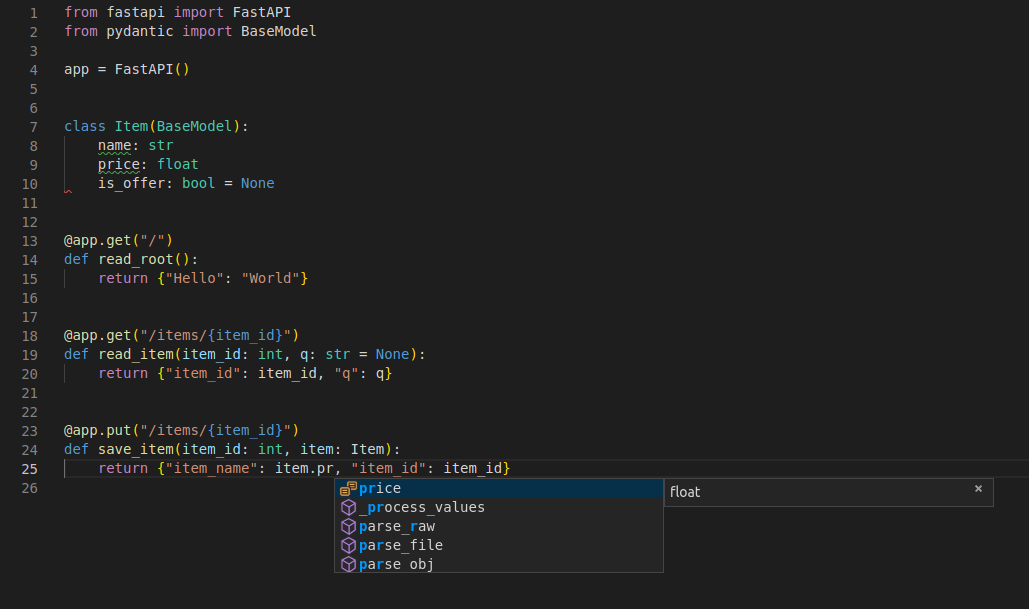
இந்த line-ஐ மாற்றிப் பார்க்கவும்:
return {"item_name": item.name, "item_id": item_id}
...from:
... "item_name": item.name ...
...to:
... "item_price": item.price ...
...அப்போ உங்க editor எப்படி attributes-ஐ auto-complete செய்யுது, அவற்றின் types-ஐ எப்படி தெரிஞ்சுக்குது என்று பார்க்கவும்:
இன்னும் நிறைய features உடன் ஒரு complete example காக Tutorial - User Guide பார்க்கவும்.
Spoiler alert: tutorial - user guide-ல இதில் எல்லாம் இருக்கு:
- வேறு பல இடங்களிலிருந்து parameters declare செய்வது: headers, cookies, form fields மற்றும் files.
maximum_lengthஅல்லதுregexபோன்ற validation constraints எப்படி set செய்வது.- மிகவும் powerful, பயன்படுத்த எளிதான Dependency Injection system.
- Security மற்றும் authentication, இதில் OAuth2 + JWT tokens மற்றும் HTTP Basic auth support.
- deeply nested JSON models declare செய்ய இன்னும் advanced (ஆனா அதே மாதிரி easy) techniques (Pydantic காரணமாக).
- Strawberry மற்றும் பிற libraries உடன் GraphQL integration.
- Starlette காரணமாக கிடைக்கும் பல extra features:
- WebSockets
- HTTPX மற்றும்
pytestஅடிப்படையில் மிகவும் easy tests - CORS
- Cookie Sessions
- ...and more.
Deploy your app (optional)
FastAPI Cloud க்கு உங்க FastAPI app-ஐ optional-ஆ deploy செய்யலாம்; இன்னும் join செய்யலன்னா waiting list-ல சேருங்க. 🚀
உங்கிடம் ஏற்கனவே FastAPI Cloud account இருந்தா (waiting list-ல இருந்து நாம் invite செய்திருப்போம் 😉), ஒரு command-லேயே app-ஐ deploy செய்யலாம்.
$ fastapi deploy

Deploying to FastAPI Cloud...

✅ Deployment successful!

🐔 Ready the chicken! Your app is ready at https://myapp.fastapicloud.dev
அவ்வளவுதான்! இப்போ அந்த URL-ல் உங்க app-ஐ access செய்யலாம். ✨
About FastAPI Cloud
FastAPI Cloud-ஐ FastAPI-யை உருவாக்கிய அதே author மற்றும் team தான் build செய்தாங்க.
ஒரு API-யை building, deploying, accessing செய்வதைக் குறைந்த முயற்சியில் smooth-ஆ மாற்றுகிறது.
FastAPI-யோட app build செய்யும்போது கிடைக்கும் அதே developer experience-ஐ cloud-க்கு deploying செய்யும்போதும் கொண்டு வருகிறது. 🎉
FastAPI and friends open source projects-க்கு FastAPI Cloud தான் primary sponsor மற்றும் funding provider. ✨
Deploy to other cloud providers
FastAPI open source, மேலும் standards அடிப்படையிலானது. நீங்க விரும்பும் எந்த cloud provider-லையாவது FastAPI apps-ஐ deploy செய்யலாம்.
FastAPI apps-ஐ deploy செய்ய உங்க cloud provider-ன் guides-ஐ follow செய்யவும். 🤓
Performance
Independent TechEmpower benchmarks-ல், Uvicorn-ல் ஓடும் FastAPI applications Python frameworks-லேயே மிகவும் வேகமான ஒன்றாக காட்டப்படுது; Starlette மற்றும் Uvicorn தங்களுக்குக் கீழே மட்டும் (FastAPI உள்ளே பயன்படுத்துவது). (*)
மேலும் புரிஞ்சுக்க Benchmarks section பார்க்கவும்.
Dependencies
FastAPI, Pydantic மற்றும் Starlette மீது depend ஆகிறது.
standard Dependencies
FastAPI-யை pip install "fastapi[standard]" மூலம் install செய்தால், standard group-ல உள்ள optional dependencies உடன் வரும்:
Pydantic பயன்படுத்துவது:
email-validator- email validation காக.
Starlette பயன்படுத்துவது:
httpx-TestClientபயன்படுத்தணும்னா required.jinja2- default template configuration பயன்படுத்தணும்னா required.python-multipart-request.form()உடன் form "parsing" support வேணும்னா required.
FastAPI பயன்படுத்துவது:
uvicorn- உங்க application-ஐ load செய்து serve செய்யும் server காக. இதில்uvicorn[standard]அடங்கும்; அதில் high performance serving காக தேவையான சில dependencies (எ.கா.uvloop) இருக்கிறது.fastapi-cli[standard]-fastapicommand வழங்க.- இதில்
fastapi-cloud-cliஅடங்கும்; இதனால் உங்க FastAPI application-ஐ FastAPI Cloud க்கு deploy செய்யலாம்.
- இதில்
Without standard Dependencies
standard optional dependencies வேண்டாம் என்றால், pip install "fastapi[standard]" க்கு பதிலாக pip install fastapi மூலம் install செய்யலாம்.
Without fastapi-cloud-cli
standard dependencies உடன் ஆனால் fastapi-cloud-cli இல்லாமல் install செய்யணும்னா, pip install "fastapi[standard-no-fastapi-cloud-cli]" பயன்படுத்தலாம்.
Additional Optional Dependencies
நீங்கள் install செய்ய விரும்பக்கூடிய சில additional dependencies-வும் உள்ளது.
Additional optional Pydantic dependencies:
pydantic-settings- settings management காக.pydantic-extra-types- Pydantic உடன் பயன்படுத்த extra types காக.
Additional optional FastAPI dependencies:
License
இந்த project, MIT license விதிமுறைகளின் கீழ் licensed ஆகிறது.