
FastAPI framework, high performance, easy to learn, fast to code, ready for production


---
**Documentation**: https://fastapi.tiangolo.com
**Source Code**: https://github.com/tiangolo/fastapi
---
FastAPI is a modern, fast (high-performance), web framework for building APIs with Python 3.6+.
The key features are:
* **Fast**: Very high performance, on par with **NodeJS** and **Go** (thanks to Starlette and Pydantic).
* **Fast to code**: Increase the speed to develop features by about 200% to 300% *.
* **Less bugs**: Reduce about 40% of human (developer) induced errors. *
* **Intuitive**: Great editor support. Completion everywhere. Less time debugging.
* **Easy**: Designed to be easy to use and learn. Less time reading docs.
* **Short**: Minimize code duplication. Multiple features from each parameter declaration. Less bugs.
* **Robust**: Get production-ready code. With automatic interactive documentation.
* **Standards-based**: Based on (and fully compatible with) the open standards for APIs: OpenAPI (previously known as Swagger) and JSON Schema.
* estimation based on tests on an internal development team, building production applications.
## Requirements
Python 3.6+
FastAPI stands on the shoulders of giants:
* Starlette for the web parts.
* Pydantic for the data parts.
## Installation
```bash
$ pip install fastapi
```
You will also need an ASGI server, for production such as uvicorn.
```bash
$ pip install uvicorn
```
## Example
### Create it
* Create a file `main.py` with:
```Python
from fastapi import FastAPI
app = FastAPI()
@app.get("/")
def read_root():
return {"Hello": "World"}
@app.get("/items/{item_id}")
def read_item(item_id: int, q: str = None):
return {"item_id": item_id, "q": q}
```
Or use async def...
If your code uses `async` / `await`, use `async def`:
```Python hl_lines="7 12"
from fastapi import FastAPI
app = FastAPI()
@app.get("/")
async def read_root():
return {"Hello": "World"}
@app.get("/items/{item_id}")
async def read_item(item_id: int, q: str = None):
return {"item_id": item_id, "q": q}
```
**Note**:
If you don't know, check the _"In a hurry?"_ section about `async` and `await` in the docs.
### Run it
Run the server with:
```bash
uvicorn main:app --debug
```
About the command uvicorn main:app --debug...
The command `uvicorn main:app` refers to:
* `main`: the file `main.py` (the Python "module").
* `app`: the object created inside of `main.py` with the line `app = FastAPI()`.
* `--debug`: make the server restart after code changes. Only do this for development.
### Check it
Open your browser at http://127.0.0.1:8000/items/5?q=somequery.
You will see the JSON response as:
```JSON
{"item_id": 5, "q": "somequery"}
```
You already created an API that:
* Receives HTTP requests in the _paths_ `/` and `/items/{item_id}`.
* Both _paths_ take `GET` operations (also known as HTTP _methods_).
* The _path_ `/items/{item_id}` has a _path parameter_ `item_id` that should be an `int`.
* The _path_ `/items/{item_id}` has an optional `str` _query parameter_ `q`.
### Interactive API docs
Now go to http://127.0.0.1:8000/docs.
You will see the automatic interactive API documentation (provided by Swagger UI):

### Alternative API docs
And now, go to http://127.0.0.1:8000/redoc.
You will see the alternative automatic documentation (provided by ReDoc):

## Example upgrade
Now modify the file `main.py` to recive a body from a `PUT` request.
Declare the body using standard Python types, thanks to Pydantic.
```Python hl_lines="2 7 8 9 10 24"
from fastapi import FastAPI
from pydantic import BaseModel
app = FastAPI()
class Item(BaseModel):
name: str
price: float
is_offer: bool = None
@app.get("/")
def read_root():
return {"Hello": "World"}
@app.get("/items/{item_id}")
def read_item(item_id: int, q: str = None):
return {"item_id": item_id, "q": q}
@app.put("/items/{item_id}")
def create_item(item_id: int, item: Item):
return {"item_name": item.name, "item_id": item_id}
```
The server should reload automatically (because you added `--debug` to the `uvicorn` command above).
### Interactive API docs upgrade
Now go to http://127.0.0.1:8000/docs.
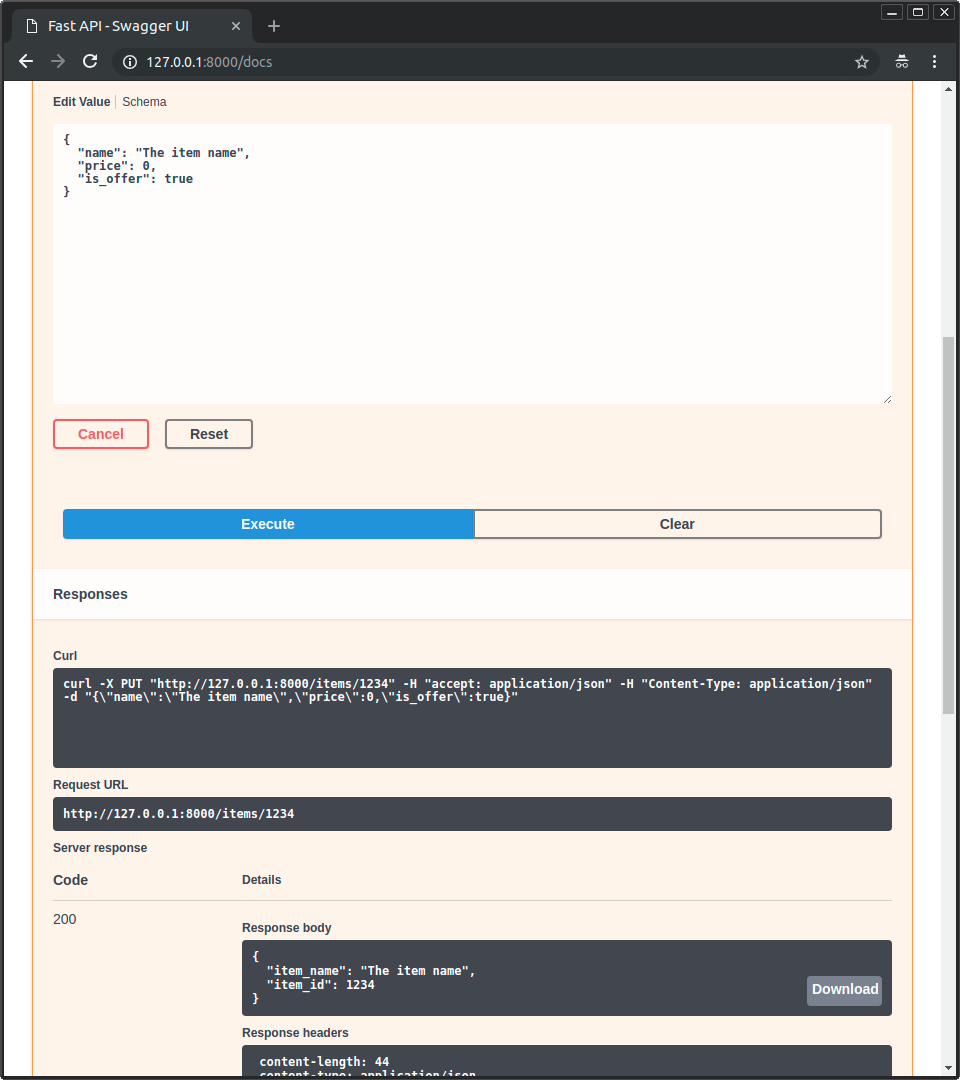
* The interactive API documentation will be automatically updated, including the new body:

* Click on the button "Try it out", it allows you to fill the parameters and directly interact with the API:

* Then click on the "Execute" button, the user interface will communicate with your API, send the parameters, get the results and show them on the screen:
### Alternative API docs upgrade
And now, go to http://127.0.0.1:8000/redoc.
* The alternative documentation will also reflect the new query parameter and body:

### Recap
In summary, you declare **once** the types of parameters, body, etc. as function parameters.
You do that with standard modern Python types.
You don't have to learn a new syntax, the methods or classes of a specific library, etc.
Just standard **Python 3.6+**.
For example, for an `int`:
```Python
item_id: int
```
or for a more complex `Item` model:
```Python
item: Item
```
...and with that single declaration you get:
* Editor support, including:
* Completion.
* Type checks.
* Validation of data:
* Automatic and clear errors when the data is invalid.
* Validation even for deeply nested JSON objects.
* Conversion of input data: coming from the network, to Python data and types. Reading from:
* JSON.
* Path parameters.
* Query parameters.
* Cookies.
* Headers.
* Forms.
* Files.
* Conversion of output data: converting from Python data and types to network data (as JSON):
* Convert Python types (`str`, `int`, `float`, `bool`, `list`, etc).
* `datetime` objects.
* `UUID` objects.
* Database models.
* ...and many more.
* Automatic interactive API documentation, including 2 alternative user interfaces:
* Swagger UI.
* ReDoc.
---
Coming back to the previous code example, **FastAPI** will:
* Validate that there is an `item_id` in the path for `GET` and `PUT` requests.
* Validate that the `item_id` is of type `int` for `GET` and `PUT` requests.
* If it is not, the client will see a useful, clear error.
* Check if there is an optional query parameter named `q` (as in `http://127.0.0.1:8000/items/foo?q=somequery`) for `GET` requests.
* As the `q` parameter is declared with `= None`, it is optional.
* Without the `None` it would be required (as is the body in the case with `PUT`).
* For `PUT` requests to `/items/{item_id}`, Read the body as JSON:
* Check that it has a required attribute `name` that should be a `str`.
* Check that is has a required attribute `price` that has to be a `float`.
* Check that it has an optional attribute `is_offer`, that should be a `bool`, if present.
* All this would also work for deeply nested JSON objects.
* Convert from and to JSON automatically.
* Document everything as an OpenAPI schema, that can be used by:
* Interactive documentation sytems.
* Automatic client code generation systems, for many languages.
* Provide 2 interactive documentation web interfaces directly.
---
We just scratched the surface, but you already get the idea of how it all works.
Try changing the line with:
```Python
return {"item_name": item.name, "item_id": item_id}
```
...from:
```Python
... "item_name": item.name ...
```
...to:
```Python
... "item_price": item.price ...
```
...and see how your editor will auto-complete the attributes and know their types:

For a more complete example including more features, see the Tutorial - User Guide.
**Spoiler alert**: the tutorial - user guide includes:
* Declaration of **parameters** from other different places as: **headers**, **cookies**, **form fields** and **files**.
* How to set **validation constrains** as `maximum_length` or `regex`.
* A very powerful and easy to use **Dependency Injection** system.
* Security and authentication, including support for **OAuth2** with **JWT tokens** and **HTTP Basic** auth.
* More advanced (but equally easy) techniques for declaring **deeply nested JSON models** (thanks to Pydantic).
* Many extra features (thanks to Starlette) as:
* **WebSockets**
* **GraphQL**
* extremely easy tests based on `requests` and `pytest`
* **CORS**
* **Cookie Sessions**
* ...and more.
## Optional Dependencies
Used by Pydantic:
* ujson - for faster JSON "parsing".
* email_validator - for email validation.
Used by Starlette:
* requests - Required if you want to use the `TestClient`.
* aiofiles - Required if you want to use `FileResponse` or `StaticFiles`.
* jinja2 - Required if you want to use the default template configuration.
* python-multipart - Required if you want to support form "parsing", with `request.form()`.
* itsdangerous - Required for `SessionMiddleware` support.
* pyyaml - Required for `SchemaGenerator` support.
* graphene - Required for `GraphQLApp` support.
* ujson - Required if you want to use `UJSONResponse`.
Used by FastAPI / Starlette:
* uvicorn - for the server that loads and serves your application.
You can install all of these with `pip3 install fastapi[full]`.
## License
This project is licensed under the terms of the MIT license.